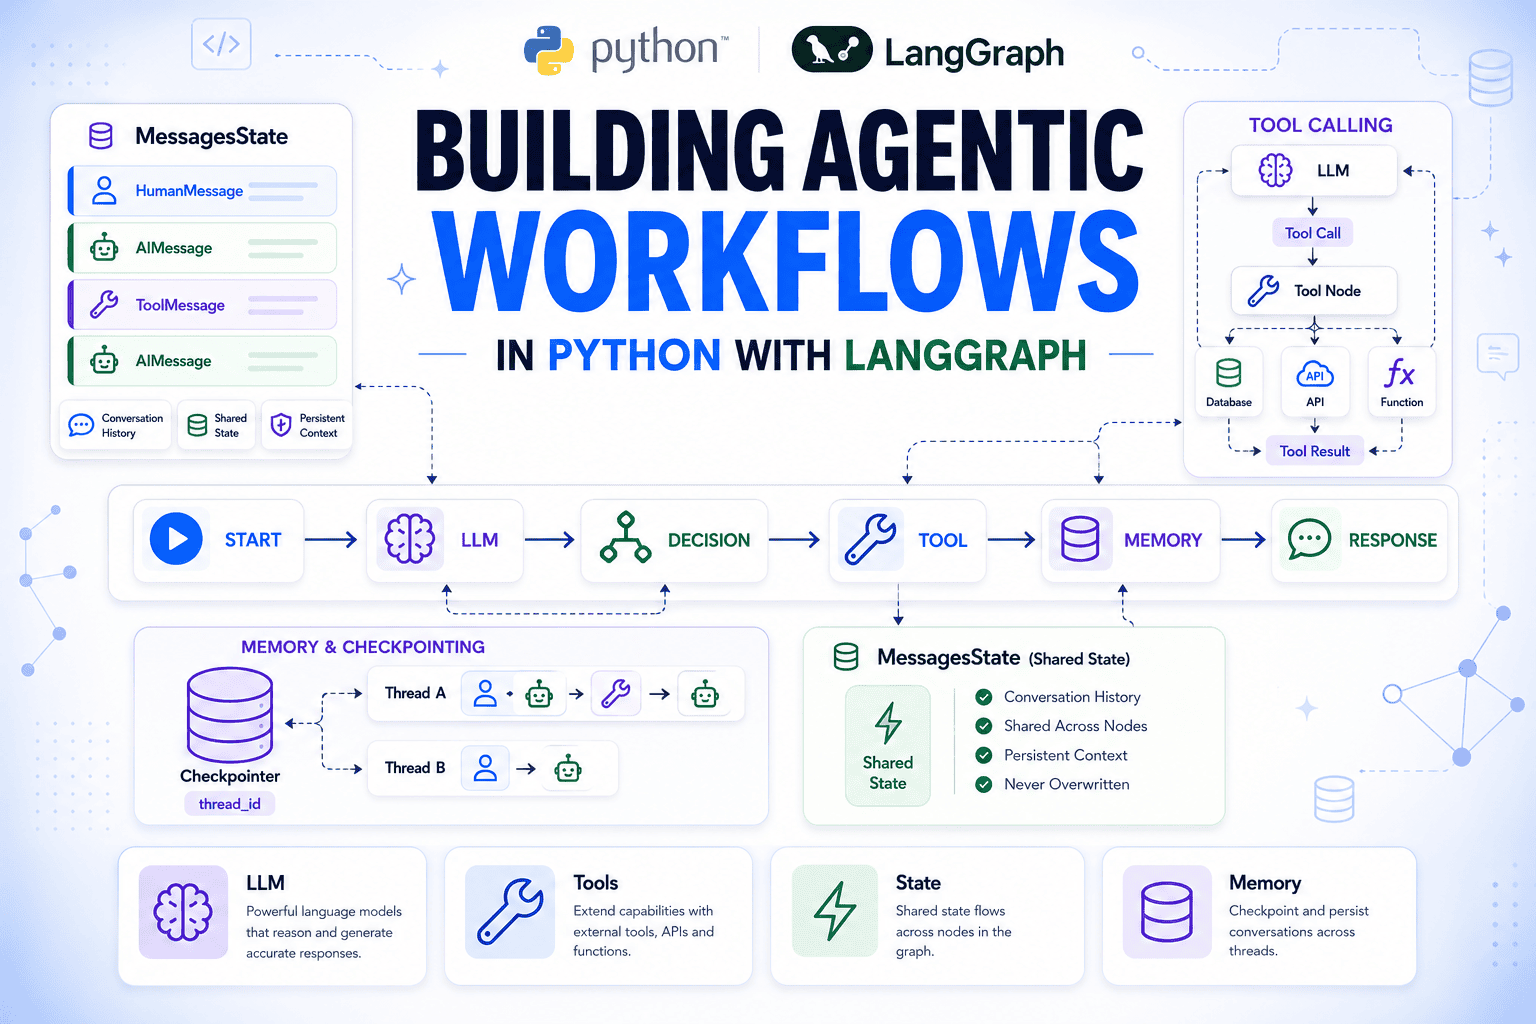
In this article, you will learn how to build a complete agentic workflow in Python with LangGraph, from a single model call to a tool-using agent with persistent conversation memory.
Topics we will cover include:
How state, nodes, and edges combine to define the execution flow of a LangGraph agent.
How to register a tool and route the model’s tool calls through the graph’s reasoning loop.
How a checkpointer persists conversation history across separate graph invocations.
Let’s not waste any more time.
Introduction
Most AI agent setups handle the single-turn case well: take a question, call a model, and return an answer. The harder problems appear soon after that. An agent may need to query your database, remember the context from earlier messages, or give you visibility into exactly what the model decided and why. Solving those challenges without building custom plumbing for every use case is where many implementations begin to break down.
LangGraph provides a clean structure for handling each of these problems. An agent is represented as a graph, where nodes are units of work, edges define what runs next, and a shared state object carries the complete message history through every step. The model runs inside a node, so every reasoning step, tool call, and response becomes part of the graph’s state. That makes the entire execution flow visible, inspectable, and available to any node that runs afterward.
In this article, you’ll learn how to understand the state, node, and edge primitives that every LangGraph graph is built on; manage conversation history automatically with MessagesState; call a language model inside a node and connect it to a graph; register a tool and route tool calls back through the model; trace the complete message sequence to see exactly what the model does at each step; and persist conversations across separate invocations with a checkpointer. We’ll build the graph from the ground up, starting with the installation steps.
State is a TypedDict that acts as the shared memory for the entire graph. Every node reads from it and writes updates back to it. Nothing passes between nodes any other way. Fields you don’t update in a node stay unchanged; you only return what you want to modify.
Nodes are plain Python functions. A node takes the current state as its argument and returns a dictionary of the fields it wants to update. Registering a function with add_node is what makes it part of the graph without the need for a special decorator or base class. If you pass just the function without a name string, LangGraph uses the function name automatically.
Edges define execution order. add_edge(A, B) means: after node A finishes, run node B. add_conditional_edges means: after node A finishes, call a routing function and go wherever it points. Every graph needs START as its entry point and at least one path to END.
By default, when a node returns a value for a state field, that value replaces what was there. For fields that should accumulate across nodes — a log, a message history — you annotate the field with a reducer function. In the following example, operator.add on a list field means append, not replace:
12345678910111213141516171819202122232425
from typing import Annotatedimport operatorfrom typing_extensions import TypedDictfrom langgraph.graph import StateGraph,START,ENDclassTicketState(TypedDict):customer_message:strlog:Annotated[list,operator.add]def log_received(state:TicketState)->dict:return{"log":[f"Received: {state['customer_message']}"]}def log_assigned(state:TicketState)->dict:return{"log":["Assigned to support queue"]}builder=StateGraph(TicketState)builder.add_node("log_received",log_received)builder.add_node("log_assigned",log_assigned)builder.add_edge(START,"log_received")builder.add_edge("log_received","log_assigned")builder.add_edge("log_assigned",END)graph=builder.compile()result=graph.invoke({"customer_message":"My invoice looks wrong","log":[]})print(result)
This outputs:
1
{'customer_message':'My invoice looks wrong','log':['Received: My invoice looks wrong','Assigned to support queue']}
Both nodes wrote to log, and both entries are there. customer_message came through untouched because neither node returned it. This is exactly how MessagesState handles its messages field, using a slightly more specialized reducer called add_messages that also handles deduplication and ordering of message objects.
Managing Conversation History with MessagesState
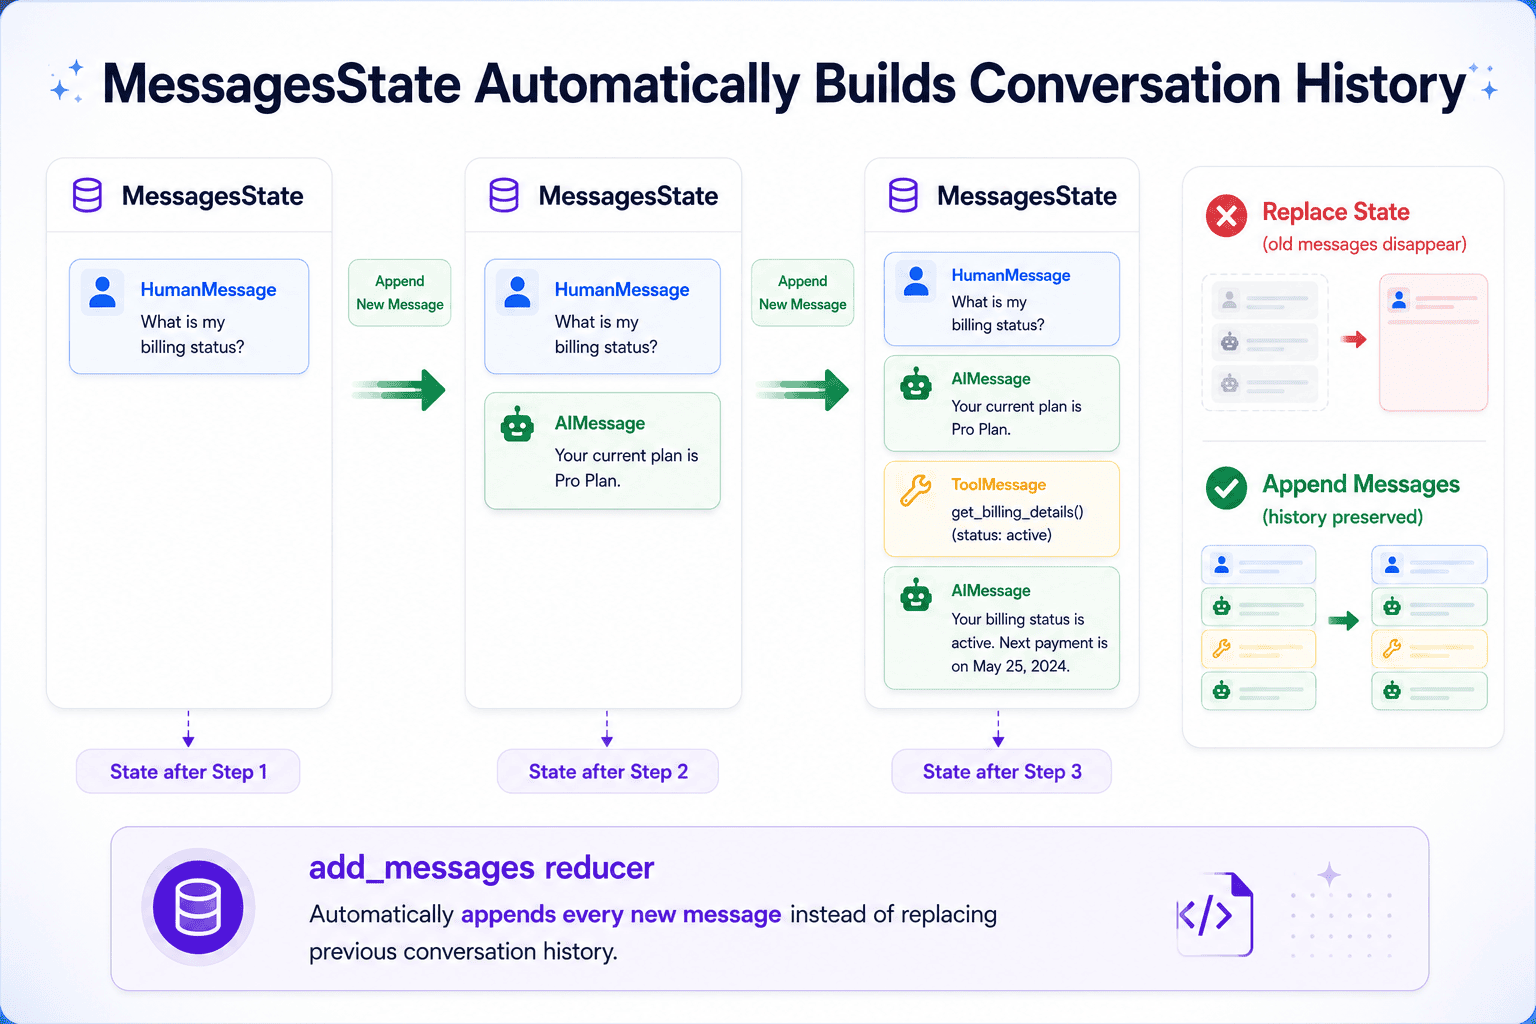
Every node in a LangGraph graph reads the current state and writes updates back to it. For a conversational agent, state needs to carry the full message history — user inputs, model responses, tool outputs — so the model always has the context it needs when deciding what to do next.
LangGraph ships a built-in state type for exactly this: MessagesState. It’s a TypedDict with a single messages field that uses the add_messages reducer instead of plain overwriting. Every time a node returns new messages, they get appended to the existing list rather than replacing it. You don’t have to stitch together conversation history manually.
1
from langgraph.graph import MessagesState
This is the state definition you’d need for most single-agent graphs. You can extend it with additional fields, say a customer_id, a priority flag, anything your nodes need. But messages is already there and already wired to accumulate.
Calling the Model Inside a Node
With the state in place, the core node of any LangGraph agent is a function that passes the current message list to a model and appends its response. The model returns an AIMessage; returning it inside a dict keyed to “messages” is all it takes to add it to state.
12345678910
from langchain_openai import ChatOpenAIfrom langchain_core.messages import SystemMessagellm=ChatOpenAI(model="gpt-4o-mini")def run_model(state:MessagesState)->dict:system=SystemMessage("You are a support agent for a SaaS product. ""Be concise and helpful.")response=llm.invoke([system]+state["messages"])return{"messages":[response]}
ChatOpenAI wraps the OpenAI API with LangChain’s standard chat model interface. Swapping to a different provider — Anthropic, Google, a local model via Ollama — means changing the import and the model string; the rest of the node stays the same. The SystemMessage sets the model’s role on every call without being stored in state, keeping the persistent history clean.
Wire it into a graph and run it:
123456789101112
from langgraph.graph import StateGraph,START,ENDfrom langchain_core.messages import HumanMessagebuilder=StateGraph(MessagesState)builder.add_node("run_model",run_model)builder.add_edge(START,"run_model")builder.add_edge("run_model",END)graph=builder.compile()result=graph.invoke({"messages":[HumanMessage("My dashboard isn't loading. What should I try?")]})print(result["messages"][-1].content)
result["messages"] is the full list: the original HumanMessage plus the AIMessage the model produced. [-1] gets the most recent one.
Registering a Tool and Routing Tool Calls
The model can answer general questions from its training data, but anything specific to your data — account details, subscription tier, ticket history — requires a tool call. The model decides when a tool is needed; your code defines what it does.
Define a tool with the @tool decorator:
123456789101112
from langchain_core.tools import tool@tooldef get_customer_tier(customer_id:str)->str:"""Look up the subscription tier for a customer by their ID. Returns 'free', 'pro', or 'enterprise'."""tiers={"cust_1001":"enterprise","cust_2002":"pro","cust_3003":"free",}returntiers.get(customer_id,"not found")
The docstring is what the model reads when deciding whether to call this tool and what arguments to pass. Keep it precise because vague docstrings lead to missed calls or malformed arguments.
Bind the tool to the model so it knows the tool exists, and update the node:
12345678
tools=[get_customer_tier]llm_with_tools=llm.bind_tools(tools)def run_model(state:MessagesState)->dict:system=SystemMessage("You are a support agent for a SaaS product. ""Use available tools when you need account-specific information.")response=llm_with_tools.invoke([system]+state["messages"])return{"messages":[response]}
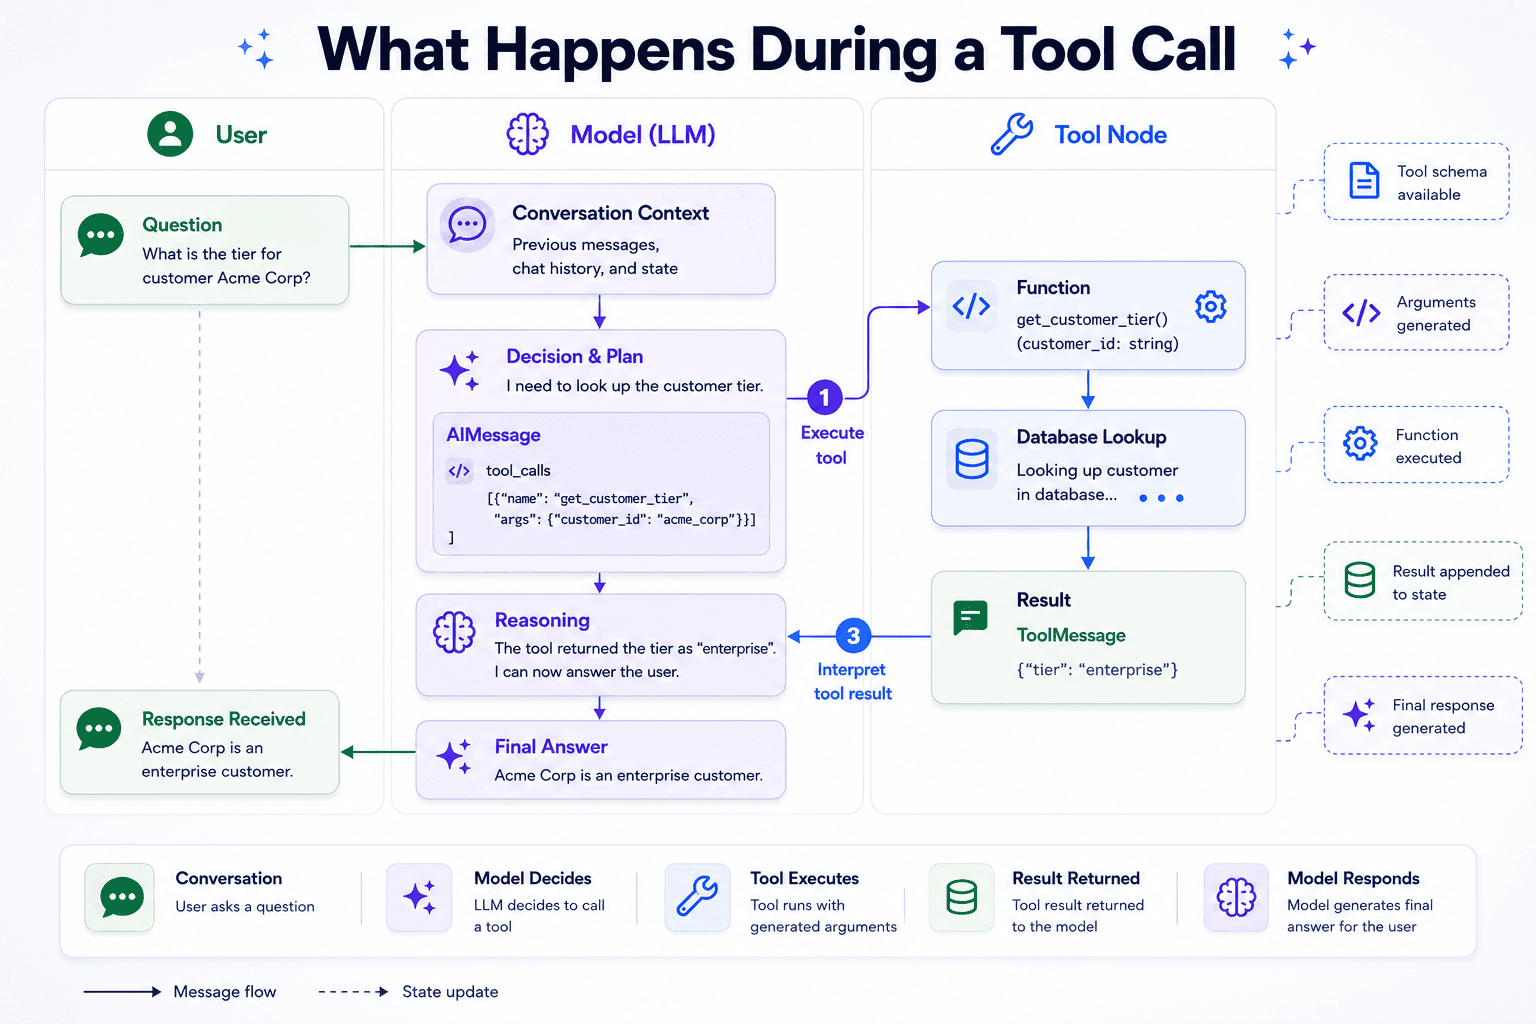
bind_tools sends the tool’s schema to the model alongside every request. When the model decides to use it, the response comes back as an AIMessage with a tool_calls field populated rather than plain text in content.
Add a ToolNode to handle execution and wire the routing:
12345678910111213
from langgraph.prebuilt import ToolNode,tools_conditiontool_node=ToolNode(tools)builder=StateGraph(MessagesState)builder.add_node("run_model",run_model)builder.add_node("tools",tool_node)builder.add_edge(START,"run_model")builder.add_conditional_edges("run_model",tools_condition)builder.add_edge("tools","run_model")graph=builder.compile()
ToolNode reads the tool_calls from the last AIMessage, runs the matching function with the arguments the model specified, and wraps the result in a ToolMessage appended to state. tools_condition checks the last AIMessage after every model call. If tool_calls is non-empty it routes to “tools“, otherwise it routes to “__end__“. The edge from “tools” back to “run_model” is what closes the loop: it sends the tool result back to the model so it can produce a final answer.
Tracing the Reasoning Loop
Before moving on, consider what actually happens inside the graph when the model uses a tool, because there’s more going on than the final output suggests.
123456
result=graph.invoke({"messages":[HumanMessage("Can you check what plan customer cust_1001 is on?")]})formsg inresult["messages"]:print(type(msg).__name__,":",msg.content ormsg.tool_calls)
Sample output:
1234
HumanMessage:Can you check what plan customer cust_1001 ison?AIMessage:[{'name':'get_customer_tier','args':{'customer_id':'cust_1001'},'id':'call_Rx7kLmNpQ2wJtA3s','type':'tool_call'}]ToolMessage:enterpriseAIMessage:Customer cust_1001 ison the enterprise plan.
Here, we have four messages and two model calls. The first model call produces an AIMessage with tool_calls populated and content empty. The model is signaling what it wants to do, not answering yet. tools_condition sees that, routes to ToolNode, which runs get_customer_tier("cust_1001") and appends a ToolMessage with the result.
The edge back to run_model fires again. Now the model has all three prior messages in context, understands the lookup succeeded, and writes the final AIMessage with the answer in content. tools_condition runs one more time, finds no tool calls, and ends the graph.
This loop — model call, tool execution, model call again — is the standard ReAct pattern. Every tool use costs two model calls: one to decide what to look up, one to interpret the result. That’s a useful thing to know when thinking about latency and cost as you add more tools.
Persisting Conversations Across Calls
Every graph.invoke() above starts with a fresh graph state. Without persistence, the model doesn’t remember previous exchanges.
To persist state between calls, attach a checkpointer when compiling the graph:
1234
from langgraph.checkpoint.memory import InMemorySavercheckpointer=InMemorySaver()graph=builder.compile(checkpointer=checkpointer)
Then pass the same thread_id on every invocation:
12345678910111213
config={"configurable":{"thread_id":"ticket-7741"}}graph.invoke({"messages":[HumanMessage("Hi, I can't access my account.")]},config,)result=graph.invoke({"messages":[HumanMessage("My ID is cust_2002, can you check my plan?")]},config,)print(result["messages"][-1].content)
Sample output:
1
You're on the pro plan, cust_2002. Since you're having trouble accessing your account,I'drecommend resetting your password first.Pro accounts also have priority support available ifthe issue continues.
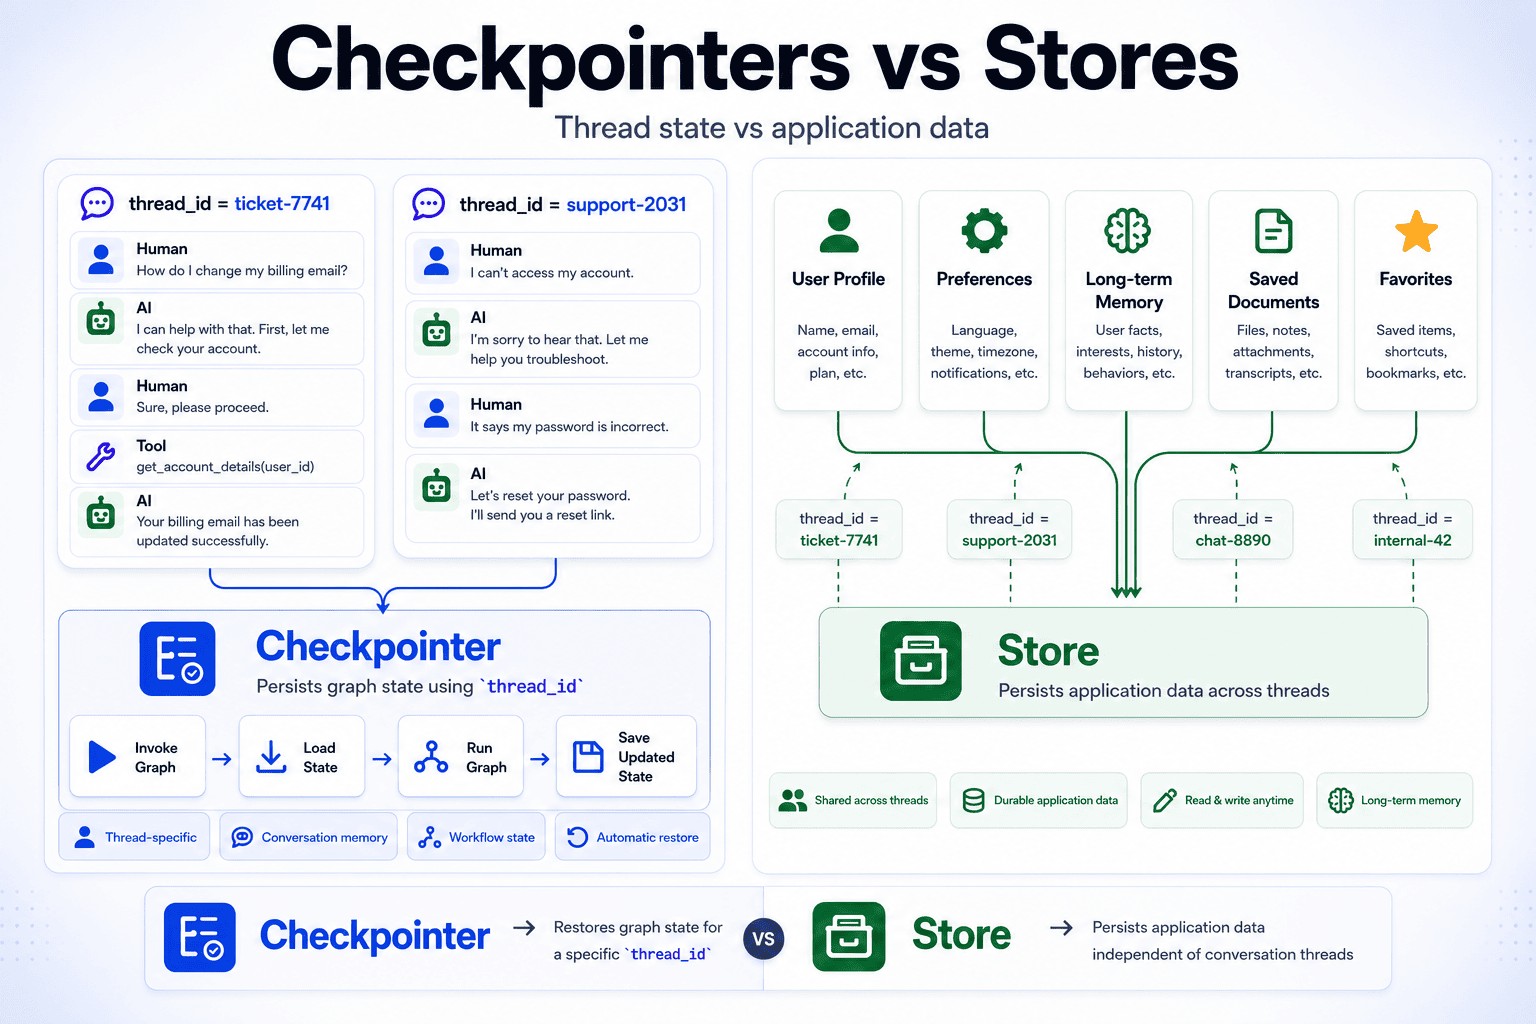
The second invocation sees the conversation from the first because the checkpointer restored the thread’s state before execution and saved the updated state afterward. Using a different thread_id starts with a separate, empty state.
InMemorySaver stores checkpoints in process memory, making it useful for development and testing. In production, you typically replace it with a persistent checkpointer backed by a database or other durable storage. The rest of your graph code stays the same.
Checkpointers persist graph state for a thread. If your application also needs to persist data independently of any conversation, such as user profiles, preferences, or long-term memories shared across multiple threads, use a Store. Stores complement checkpointers by providing durable application-level storage that graphs can access during execution.
Wrapping Up
In this article, you built a complete LangGraph agent from the ground up. Along the way, you learned how state flows through a graph, how nodes execute work, how tools fit into the execution loop, and how a checkpointer preserves conversations across separate invocations. Those same building blocks scale from simple chatbots to much more sophisticated agent workflows.
One of LangGraph’s strengths is that each piece is independent. You can swap language models, register new tools, or change how conversations are persisted without redesigning the rest of the graph. Everything communicates through shared state, which keeps the graph predictable and easy to extend.
The same ideas also carry over to multi-agent systems. A coordinator that routes requests to specialist agents is still a graph with state, nodes, and conditional edges. The architecture becomes larger, but the underlying primitives stay the same.
If you’d like to explore further, the following resources are a good place to continue:
 Aitishiku.com